
7.5 JPA支持
JPA(Java Persistence API)技术用于在关系数据库中管理Java对象的持久化,它允许我们将数据库表映射为Java类。在Spring Boot中,使用JPA可以大大简化数据库操作,Spring Boot适用的JPA实现是Hibernate。本节将介绍如何在Spring Boot应用中使用JPA。
首先,在pom.xml文件中引入必要的依赖来支持JPA和H2数据库,如代码7-10所示:
在pom.xml中添加配置
这段代码插入到如图7-13所示的位置:
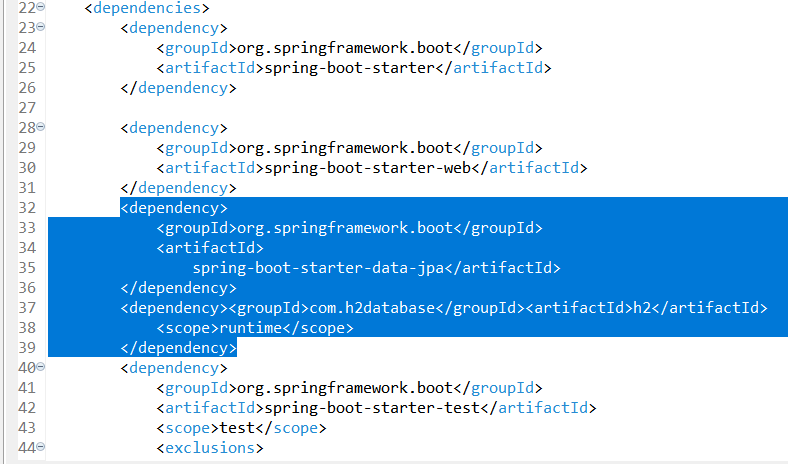
这里com.h2database是一个轻便的内存数据库,它在运行时被Spring Boot自动配置,使我们免于手动配置数据库,快速了解JPA的特性。
此段配置保存到pom.xml文件后,项目马上就会进行编译并下载相应的资源。
让我们深入看看几个关键的Java文件。类和包的创建步骤略过,可自行操作。
1.Customer.java
这是一个实体类,与数据库表直接映射。使用@Entity标签表明其作为持久化对象,并且每个属性与数据库列对应。示例代码如代码7-11所示:
实体类Customer.java
2.CustomerRepository.java
这个类表示数据持久层的接口,它继承CrudRepository提供基本的CRUD操作。我们定义一些自定义查询方法来满足业务需求,如代码7-12所示:
数据库访问层类 CustomerRepository.java
这是一个接口,它需要继承一个接口CrudRepository,这个接口需要将指定泛型的类型,第一个参数是要处理的映射类,第二个参数是个Long类型,它是这个映射类的主键的类型。
这里定义了两个方法,findByLastName通过lastName查找Customer,结果是一个集合;findById通过主键id查找,结果唯一。
这个接口是用来定义处理Customer表的所有方法的,此处只列了两个,假如还有更多对于Customer表的操作(例如更新、删除),对应的方法也要写在此类。
看到这里,可能已经有人发现:CustomerRepository只是一个接口,并没有实现,实现类在哪里?具体要执行的SQL语句在哪里?
不需要实现类。实现由Spring Data JPA提供,你只需要定义接口,具体SQL语句是自动生成的。在程序运行时,Spring框架会自动为CustomerRepository创建一个实现类,并且此实现类会作为一个Spring Bean被注入到你的服务(Service)层或其他需要依赖注入的组件,供应用程序使用。
另外findById和findByLastName并不是随便写的,必须在Customer类里存在id和lastName这两个属性。findBy也是规范之一。
关于GRUD操作方法的规范命名,Spring Boot的JPA提供了很完备的命名规范,关于repository的更多细节将在7.8节介绍。
3.修改启动类
在启动类添加方法CommandLineRunner,此方法来演示如何操作数据库。Spring Boot应用在启动时会运行这个方法提供的代码,它合理地使用了JPA仓库来保存和检索Customer实例。现在的启动类DemoApplication 的代码如7-13所示:
在启动类添加测试方法
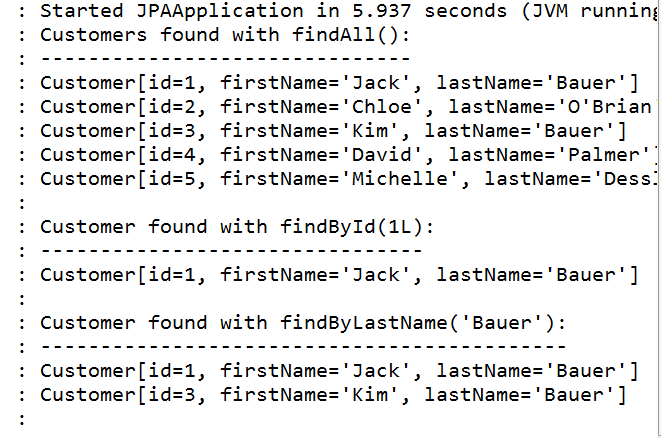
含有@bean标签的方法,都会在启动的时候初始化,这个方法展示了Customer的两个获取方法。重新启动Spring Boot,运行的结果直接显示在控制台,如图7-14所示:
《前后端穿透》课程目录
按教材顺序从 Vue 前端讲到 Spring Boot 后端:模板、组件、路由、axios、Controller、JPA、文件上传、Nginx 部署,最后完成学习平台实训。10 章 71 节,配 220 张操作截图与可直接运行的代码。
- 第1章 前端介绍
- 1.1 前端和后台
- 1.2 vue.js是什么
- 1.3 vue开发环境设置
- 1.4 第一个vue项目
- 1.5 Git代码管理
- 第2章 vue的基础
- 2.1 示范项目的简单解释
- 2.2 插值
- 2.3 插入原始HTML
- 2.4 双向绑定
- 2.5 条件
- 2.6 实训:模拟登陆
- 2.7 循环
- 2.8 实训:显示学生成绩
- 第3章 vue组件技术
- 3.1 组件
- 3.2 组件的构成
- 3.3 组件的data和props
- 3.4 组件的script
- 3.5 组件的template部分的事件绑定
- 3.6 组件路由
- 3.7 组件间通信(未完成)
- 3.8 动态计算变量
- 3.9 页面跳转
- 3.10 watch机制
- 第4章 获取数据
- 4.1 http请求是什么
- 4.2 axios模块
- 4.3 实训:查找数据库登录
- 第5章 实训:重构网站
- 5.1 需求
- 5.2 组件设计:游戏主页MobieGame
- 5.3 开始重构页面
- 5.4 组件设计:框架GameFrame
- 5.5 再次修改MobileGame
- 5.6 继续GameFrame组件
- 5.7 组件设计:游戏卡片Game
- 5.8 横排还是竖排?
- 5.9 组件设计:游戏详情组件
- 第6章 Spring Boot介绍
- 6.1 开发工具
- 6.2 第一个Spring Boot项目
- 6.3 maven项目结构介绍
- 6.4 启动项目
- 6.5 Spring Boot项目的部署
- 第7章 Spring Boot基本特性
- 7.1 响应HTTP请求
- 7.2 发送json数据
- 7.3 Controller
- 7.4 从对象自动构建JSON
- 7.5 JPA支持
- 7.6 MySQL支持
- 7.7 实体类配置
- 7.8 repository
- 7.9 service
- 7.10 文件上传
- 第8章 Nginx
- 8.1 原文:多项目与反向代理
- 8.2 Nginx 的安装与配置结构
- 8.3 upstream 与反向代理补全
- 8.4 部署 Vue 前端与 /api 反向代理
- 8.5 HTTPS 与证书
- 8.6 常见错误排查
- 8.7 一份完整的上线配置
- 8.8 上线检查清单
- 第9章 实训:学习平台
- 9.1 创建顶部菜单组件
- 9.2 添加底部信息组件
- 9.3 中间内容部分组件
- 9.4 添加About组件
- 9.5 添加Study组件
- 9.6 添加sidebar
- 9.7 sidebar功能完善
- 第10章 附录:ES6常用特性
- 10.1 变量声明
- 10.2 字符串
- 10.3 对象
- 10.4 lambda表达式
- 10.5 模块
- 10.6 修饰符