表单修饰符
填写表单,最常用的是input!v-model~
而我们的修饰符正是为了简化这些东西而存在的
.lazy
<div>
<br/>
<input type="text" v-model="value"/>
<br/>
<p>
{{value}}
</p>
<br/>
</div>
<div>
<input type="text" v-model="value"/>
<p>
{{value}}
</p>
</div>
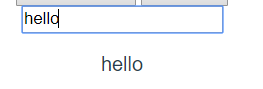
从这里我们可以看到,我们还在输入的时候,光标还在的时候,下面的值就已经出来了,可以说是非常地实时。
但是有时候我们希望,在我们输入完所有东西,光标离开才更新视图。
<div>
<input type="text" v-model.lazy="value"><p>{{value}}</p>
</div>
这样即可~这样只有当我们光标离开输入框的时候,它才会更新视图,相当于在onchange事件触发更新。
.trim
在我们的输入框中,我们经常需要过滤一下前后的空格,那么只需要这么写:
<input type="text" v-model.trim="value"/>
需要注意的是,它只能过滤首尾的空格!首尾,中间的是不会过滤的
.number
看这个名字就知道,应该是限制输入数字或者输入的东西转换成数字
如果你先输入数字,那它就会限制你输入的只能是数字。
如果你先输入字符串,那它就相当于没有加.number
事件修饰符
.stop
由于事件冒泡的机制,我们给元素绑定点击事件的时候,也会触发父级的点击事件。
<div @click="shout(2) ">
<button @click="shout(1)"/>
</div>
shout(e){
一键阻止事件冒泡,简直方便得不行。相当于调用了event.stopPropagation()方法。
<div @click="shout(2) ">
<button @click.stop="shout(1)"/>
</div>
.prevent
用于阻止事件的默认行为,例如,当点击提交按钮时阻止对表单的提交。相当于调用了event.preventDefault()方法。
注意:修饰符可以同时使用多个,但是可能会因为顺序而有所不同。
用v-on:click.prevent.self会阻止所有的点击,而v-on:click.self.prevent只会阻止对元素自身的点击。也就是从左往右判断~
.self
只当事件是从事件绑定的元素本身触发时才触发回调。像下面所示,刚刚我们从.stop时候知道子元素会冒泡到父元素导致触发父元素的点击事件,当我们加了这个.self以后,我们点击button不会触发父元素的点击事件shout,只有当点击到父元素的时候(蓝色背景)才会shout~从这个self的英文翻译过来就是‘自己,本身’可以看出这个修饰符的用法
<button@click=" shout(1)=" " "="">
<button@click=" shout(1)=" " "="">.once
<button@click=" shout(1)=" " "="">这个修饰符的用法也是和名字一样简单粗暴,只能用一次,绑定了事件以后只能触发一次,第二次就不会触发。
<button@click.once=" shout(1)=" " "="">
<button@click=" shout(1)=" " "=""><button@click.once=" shout(1)=" " "="">
<button@click=" shout(1)=" " "=""><button@click.once=" shout(1)=" " "="">.capture
<button@click=" shout(1)=" " "=""><button@click.once=" shout(1)=" " "="">从上面我们知道了事件的冒泡,其实完整的事件机制是:捕获阶段--目标阶段--冒泡阶段。
<button@click=" shout(1)=" " "=""><button@click.once=" shout(1)=" " "="">默认的呢,是事件触发是从目标开始往上冒泡。
<button@click=" shout(1)=" " "=""><button@click.once=" shout(1)=" " "="">当我们加了这个.capture以后呢,我们就反过来了,事件触发从包含这个元素的顶层开始往下触发。
<div@click.capture=" shout(1)=" " "=""><div@click.capture=" shout(2)=" " "=""><div@click=" shout(3)=" " "=""><div@click=" shout(4)=" " "="">
<button@click=" shout(1)=" " "=""><button@click.once=" shout(1)=" " "=""><div@click.capture=" shout(1)=" " "=""><div@click.capture=" shout(2)=" " "=""><div@click=" shout(3)=" " "=""><div@click=" shout(4)=" " "=""> .passive
<button@click=" shout(1)=" " "=""><button@click.once=" shout(1)=" " "=""><div@click.capture=" shout(1)=" " "=""><div@click.capture=" shout(2)=" " "=""><div@click=" shout(3)=" " "=""><div@click=" shout(4)=" " "="">当我们在监听元素滚动事件的时候,会一直触发onscroll事件,在pc端是没啥问题的,但是在移动端,会让我们的网页变卡,因此我们使用这个修饰符的时候,相当于给onscroll事件整了一个.lazy修饰符
<button@click=" shout(1)=" " "=""><button@click.once=" shout(1)=" " "=""><div@click.capture=" shout(1)=" " "=""><div@click.capture=" shout(2)=" " "=""><div@click=" shout(3)=" " "=""><div@click=" shout(4)=" " "="">
<button@click=" shout(1)=" " "=""><button@click.once=" shout(1)=" " "=""><div@click.capture=" shout(1)=" " "=""><div@click.capture=" shout(2)=" " "=""><div@click=" shout(3)=" " "=""><div@click=" shout(4)=" " "="">.native
<button@click=" shout(1)=" " "=""><button@click.once=" shout(1)=" " "=""><div@click.capture=" shout(1)=" " "=""><div@click.capture=" shout(2)=" " "=""><div@click=" shout(3)=" " "=""><div@click=" shout(4)=" " "="">我们经常会写很多的小组件,有些小组件可能会绑定一些事件,但是,像下面这样绑定事件是不会触发的
<button@click=" shout(1)=" " "=""><button@click.once=" shout(1)=" " "=""><div@click.capture=" shout(1)=" " "=""><div@click.capture=" shout(2)=" " "=""><div@click=" shout(3)=" " "=""><div@click=" shout(4)=" " "=""><my-component@click=" shout(3)=" " "=""> 必须使用.native来修饰这个click事件(即),可以理解为该修饰符的作用就是把一个vue组件转化为一个普通的HTML标签,
<button@click=" shout(1)=" " "=""><button@click.once=" shout(1)=" " "=""><div@click.capture=" shout(1)=" " "=""><div@click.capture=" shout(2)=" " "=""><div@click=" shout(3)=" " "=""><div@click=" shout(4)=" " "=""><my-component@click=" shout(3)=" " "=""> 注意:使用.native修饰符来操作普通HTML标签是会令事件失效的
<button@click=" shout(1)=" " "=""><button@click.once=" shout(1)=" " "=""><div@click.capture=" shout(1)=" " "=""><div@click.capture=" shout(2)=" " "=""><div@click=" shout(3)=" " "=""><div@click=" shout(4)=" " "=""><my-component@click=" shout(3)=" " "="">鼠标和键盘点击修饰符
<button@click=" shout(1)=" " "=""><button@click.once=" shout(1)=" " "=""><div@click.capture=" shout(1)=" " "=""><div@click.capture=" shout(2)=" " "=""><div@click=" shout(3)=" " "=""><div@click=" shout(4)=" " "=""><my-component@click=" shout(3)=" " "="">刚刚我们讲到这个click事件,我们一般是会用左键触发,有时候我们需要更改右键菜单啥的,就需要用到右键点击或者中间键点击,这个时候就要用到鼠标按钮修饰符
.left左键点击
.right右键点击
.middle中键点击
<button@click=" shout(1)=" " "=""><button@click.once=" shout(1)=" " "=""><div@click.capture=" shout(1)=" " "=""><div@click.capture=" shout(2)=" " "=""><div@click=" shout(3)=" " "=""><div@click=" shout(4)=" " "=""><my-component@click=" shout(3)=" " "=""><button@click.right="shout(1)">
<button@click=" shout(1)=" " "=""><button@click.once=" shout(1)=" " "=""><div@click.capture=" shout(1)=" " "=""><div@click.capture=" shout(2)=" " "=""><div@click=" shout(3)=" " "=""><div@click=" shout(4)=" " "=""><my-component@click=" shout(3)=" " "=""><button@click.right="shout(1)"> 键值修饰符
<button@click=" shout(1)=" " "=""><button@click.once=" shout(1)=" " "=""><div@click.capture=" shout(1)=" " "=""><div@click.capture=" shout(2)=" " "=""><div@click=" shout(3)=" " "=""><div@click=" shout(4)=" " "=""><my-component@click=" shout(3)=" " "=""><button@click.right="shout(1)">其实这个也算是事件修饰符的一种,因为它都是用来修饰键盘事件的。
<button@click=" shout(1)=" " "=""><button@click.once=" shout(1)=" " "=""><div@click.capture=" shout(1)=" " "=""><div@click.capture=" shout(2)=" " "=""><div@click=" shout(3)=" " "=""><div@click=" shout(4)=" " "=""><my-component@click=" shout(3)=" " "=""><button@click.right="shout(1)"> 比如onkeyup,onkeydown啊
<button@click=" shout(1)=" " "=""><button@click.once=" shout(1)=" " "=""><div@click.capture=" shout(1)=" " "=""><div@click.capture=" shout(2)=" " "=""><div@click=" shout(3)=" " "=""><div@click=" shout(4)=" " "=""><my-component@click=" shout(3)=" " "=""><button@click.right="shout(1)"> .keyCode
<button@click=" shout(1)=" " "=""><button@click.once=" shout(1)=" " "=""><div@click.capture=" shout(1)=" " "=""><div@click.capture=" shout(2)=" " "=""><div@click=" shout(3)=" " "=""><div@click=" shout(4)=" " "=""><my-component@click=" shout(3)=" " "=""><button@click.right="shout(1)"> 如果不用keyCode修饰符,那我们每次按下键盘都会触发shout,当我们想指定按下某一个键才触发这个shout的时候,这个修饰符就有用了,具体键码查看键码对应表
<button@click=" shout(1)=" " "=""><button@click.once=" shout(1)=" " "=""><div@click.capture=" shout(1)=" " "=""><div@click.capture=" shout(2)=" " "=""><div@click=" shout(3)=" " "=""><div@click=" shout(4)=" " "=""><my-component@click=" shout(3)=" " "=""><button@click.right="shout(1)">
<input type="text" @keyup.keyCode="shout(4)"/>
<button@click=" shout(1)=" " "=""><button@click.once=" shout(1)=" " "=""><div@click.capture=" shout(1)=" " "=""><div@click.capture=" shout(2)=" " "=""><div@click=" shout(3)=" " "=""><div@click=" shout(4)=" " "=""><my-component@click=" shout(3)=" " "=""><button@click.right="shout(1)"> 为了方便我们使用,vue给一些常用的键提供了别名
<button@click=" shout(1)=" " "=""><button@click.once=" shout(1)=" " "=""><div@click.capture=" shout(1)=" " "=""><div@click.capture=" shout(2)=" " "=""><div@click=" shout(3)=" " "=""><div@click=" shout(4)=" " "=""><my-component@click=" shout(3)=" " "=""><button@click.right="shout(1)">//普通键
<button@click=" shout(1)=" " "=""><button@click.once=" shout(1)=" " "=""><div@click.capture=" shout(1)=" " "=""><div@click.capture=" shout(2)=" " "=""><div@click=" shout(3)=" " "=""><div@click=" shout(4)=" " "=""><my-component@click=" shout(3)=" " "=""><button@click.right="shout(1)">.enter.tab.delete//(捕获“删除”和“退格”键).space.esc.up.down.left.right
<button@click=" shout(1)=" " "=""><button@click.once=" shout(1)=" " "=""><div@click.capture=" shout(1)=" " "=""><div@click.capture=" shout(2)=" " "=""><div@click=" shout(3)=" " "=""><div@click=" shout(4)=" " "=""><my-component@click=" shout(3)=" " "=""><button@click.right="shout(1)">//系统修饰键
<button@click=" shout(1)=" " "=""><button@click.once=" shout(1)=" " "=""><div@click.capture=" shout(1)=" " "=""><div@click.capture=" shout(2)=" " "=""><div@click=" shout(3)=" " "=""><div@click=" shout(4)=" " "=""><my-component@click=" shout(3)=" " "=""><button@click.right="shout(1)">.ctrl.alt.meta.shift
<button@click=" shout(1)=" " "=""><button@click.once=" shout(1)=" " "=""><div@click.capture=" shout(1)=" " "=""><div@click.capture=" shout(2)=" " "=""><div@click=" shout(3)=" " "=""><div@click=" shout(4)=" " "=""><my-component@click=" shout(3)=" " "=""><button@click.right="shout(1)">我们从上面看到,键分成了普通常用的键和系统修饰键,区别是什么呢?
<button@click=" shout(1)=" " "=""><button@click.once=" shout(1)=" " "=""><div@click.capture=" shout(1)=" " "=""><div@click.capture=" shout(2)=" " "=""><div@click=" shout(3)=" " "=""><div@click=" shout(4)=" " "=""><my-component@click=" shout(3)=" " "=""><button@click.right="shout(1)">当我们写如下代码的时候,我们会发现如果仅仅使用系统修饰键是无法触发keyup事件的。
<button@click=" shout(1)=" " "=""><button@click.once=" shout(1)=" " "=""><div@click.capture=" shout(1)=" " "=""><div@click.capture=" shout(2)=" " "=""><div@click=" shout(3)=" " "=""><div@click=" shout(4)=" " "=""><my-component@click=" shout(3)=" " "=""><button@click.right="shout(1)">
<input type="text" @keyup.ctrl="shout(4)"/>
<button@click=" shout(1)=" " "=""><button@click.once=" shout(1)=" " "=""><div@click.capture=" shout(1)=" " "=""><div@click.capture=" shout(2)=" " "=""><div@click=" shout(3)=" " "=""><div@click=" shout(4)=" " "=""><my-component@click=" shout(3)=" " "=""><button@click.right="shout(1)">那该如何呢?我们需要将系统修饰键和其他键码链接起来使用,比如
<button@click=" shout(1)=" " "=""><button@click.once=" shout(1)=" " "=""><div@click.capture=" shout(1)=" " "=""><div@click.capture=" shout(2)=" " "=""><div@click=" shout(3)=" " "=""><div@click=" shout(4)=" " "=""><my-component@click=" shout(3)=" " "=""><button@click.right="shout(1)">
<input type="text" @keyup.ctrl.67="shout(4)"/>
<button@click=" shout(1)=" " "=""><button@click.once=" shout(1)=" " "=""><div@click.capture=" shout(1)=" " "=""><div@click.capture=" shout(2)=" " "=""><div@click=" shout(3)=" " "=""><div@click=" shout(4)=" " "=""><my-component@click=" shout(3)=" " "=""><button@click.right="shout(1)"> 这样当我们同时按下ctrl+c时,就会触发keyup事件。 另,如果是鼠标事件,那就可以单独使用系统修饰符。
<button@mouseover.ctrl=" shout(1)=" " "=""><button@mousedown.ctrl=" shout(1)=" " "=""><button@click.ctrl.67=" shout(1)=" " "="">
<button@click=" shout(1)=" " "=""><button@click.once=" shout(1)=" " "=""><div@click.capture=" shout(1)=" " "=""><div@click.capture=" shout(2)=" " "=""><div@click=" shout(3)=" " "=""><div@click=" shout(4)=" " "=""><my-component@click=" shout(3)=" " "=""><button@click.right="shout(1)"><button@mouseover.ctrl=" shout(1)=" " "=""><button@mousedown.ctrl=" shout(1)=" " "=""><button@click.ctrl.67=" shout(1)=" " "="">大概是什么意思呢,就是你不能单手指使用系统修饰键的修饰符(最少两个手指,可以多个)。你可以一个手指按住系统修饰键一个手指按住另外一个键来实现键盘事件。也可以用一个手指按住系统修饰键,另一只手按住鼠标来实现鼠标事件。
error_page 500 502 503 504 /50x.html;
location = /50x.html {
root html;
复制 server {
listen 80;
server_name Ai.baidu.com;
location / {
proxy_pass http://Ai.baidu;
error_page 500 502 503 504 /50x.html;
location = /50x.html {
root html;
标签: Linux, 反向代理
